Kotlinで開発を行っているエンジニアのみなさま、ようこそ!
メモリアインクのすだです。
今回は、テキスト(TextView)やボタン(Button)、画像(ImageView)などの要素を画面の好きな場所に配置する方法をご紹介します。
この記事を読んでわかること…
・要素を画面中央に配置する方法
・要素を指定の位置に配置する方法
環境
- Kotlin (ver 1.9.0)
- Android Studio (Giraffe | 2022.3.1 Patch 3)
テキストやボタンを画面中央に配置する方法
画面中央に要素を表示するにあたり、以下の2つの例をご紹介します。
1. ConstraintLayoutを使用する例
ConstraintLayoutは、要素の配置を指定できるものです。
1つの要素につき4辺(上下左右)に制約を持たせることによって配置を調整していきます。
中央揃えにするには、以下のようにコードを書いていきます。
<androidx.constraintlayout.widget.ConstraintLayout
    xmlns:android="http://schemas.android.com/apk/res/android"
    xmlns:app="http://schemas.android.com/apk/res-auto"
    android:layout_width="match_parent"
    android:layout_height="match_parent">

    <TextView
        android:text="運動不足!"
        android:layout_width="wrap_content"
        android:layout_height="wrap_content"

        <!-- ここ重要 -->
        app:layout_constraintTop_toTopOf="parent"
        app:layout_constraintBottom_toBottomOf="parent"
        app:layout_constraintStart_toStartOf="parent"
        app:layout_constraintEnd_toEndOf="parent" />

</androidx.constraintlayout.widget.ConstraintLayout>
画面表示をしてみると… ↓
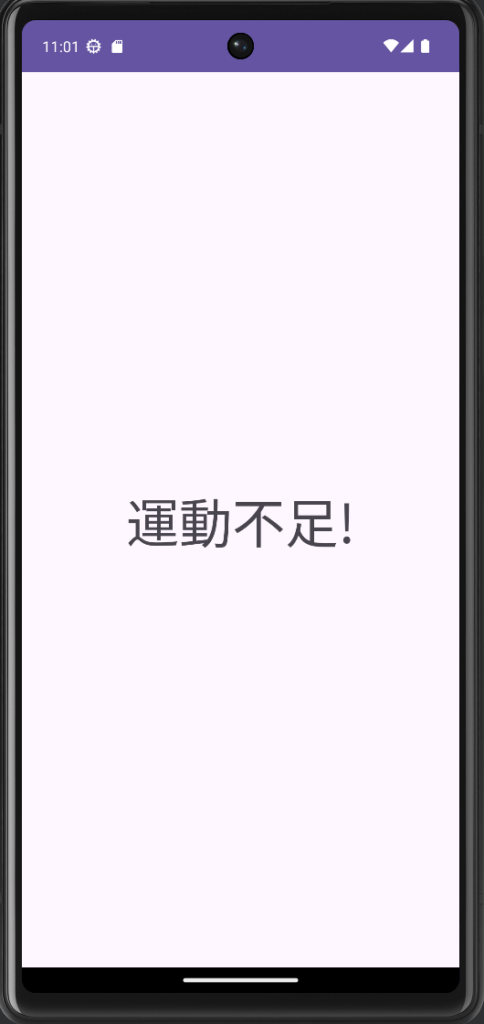
おっとすみません、最近ジムを契約しようか迷っているすだの心の声が現れてしまいました。
要素を画面中央に配置できましたね!
もちろんテキストだけでなく、ボタンや画像なども同じようにして配置可能です。
このように「ConstraintLayout」を使用して中央揃えする場合は、特定の要素(この場合はTextView)の上下左右4辺に適切な設定を行う必要があります。
ではでは、配置の設定についてより細かく掘り下げてみましょう!↓
app:layout_constraintTop_toTopOf="parent"
app:layout_constraintBottom_toBottomOf="parent"
app:layout_constraintStart_toStartOf="parent"
app:layout_constraintEnd_toEndOf="parent"
上記のように、上下左右それぞれの端に“parent”(親要素)を指定してあげます。
layout_constraintStart_toStartOf="parent"は 要素の上端を親要素の上端に合わせる設定。これによって、画面の一番上に配置されます。
layout_constraintBottom_toBottomOf="parent"は要素の下端を親要素の下端に合わせる設定。これによって、画面の一番下に配置されます。
layout_constraintStart_toStartOf="parent"は要素の左端を親要素の左端に合わせる設定。これによって、画面の左端に配置されます。
layout_constraintEnd_toEndOf="parent"は要素の右端を親要素の右端に合わせる設定。これによって、画面の右端に配置されます。
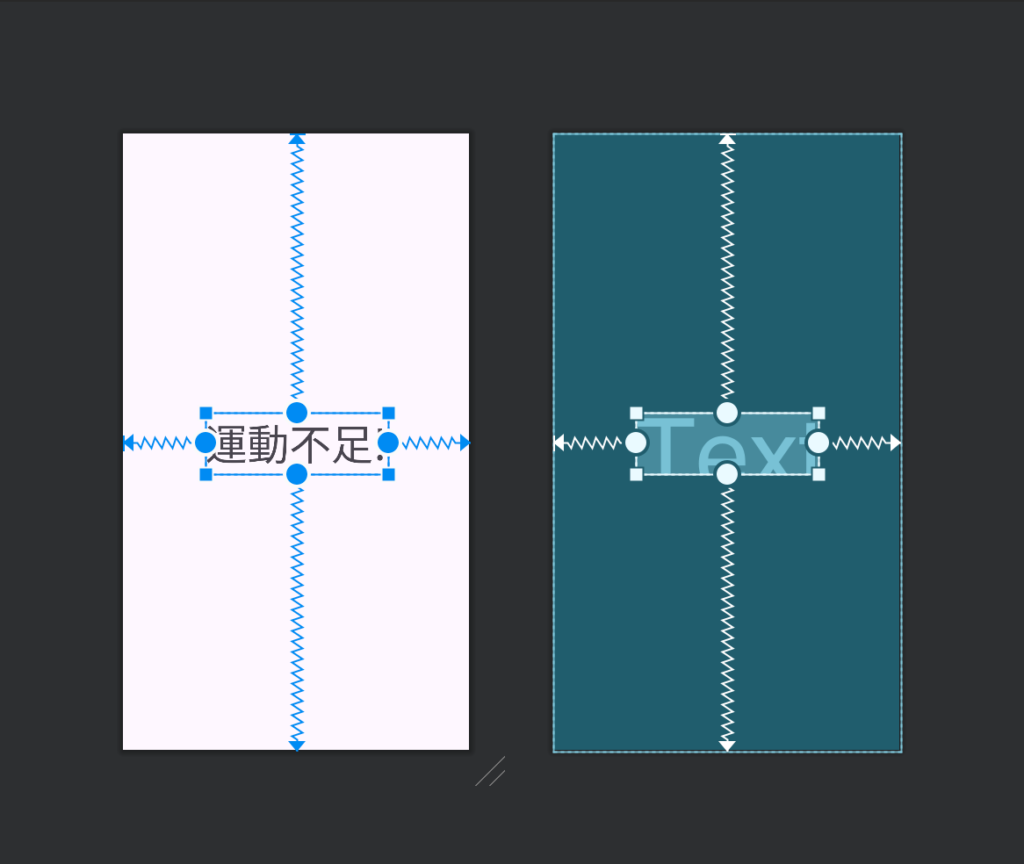
結果として これら上下左右4方向への制約により、親要素に対して中央揃えに配置されて、画面全体を占める形(4方向に広がる形)になります。
イメージとしては以下の画像を見ていただくとわかりやすいです!各4辺それぞれを端に合わせる設定にしているので、結果中央に位置されるということになります。↓
2. LinearLayoutを使用する例
LinearLayoutは縦横の垂直方向に要素を並べることができるものです。中央揃えにするには、以下のように書いていきます。
<LinearLayout
    xmlns:android="http://schemas.android.com/apk/res/android"
    android:layout_width="match_parent"
    android:layout_height="match_parent"
  <!-- ここ重要 -->
    android:gravity="center">

    <TextView
        android:layout_width="wrap_content"
        android:layout_height="wrap_content"
        android:text="ハイボール!"
        android:textSize="50dp" />

</LinearLayout>
画面表示してみると…↓
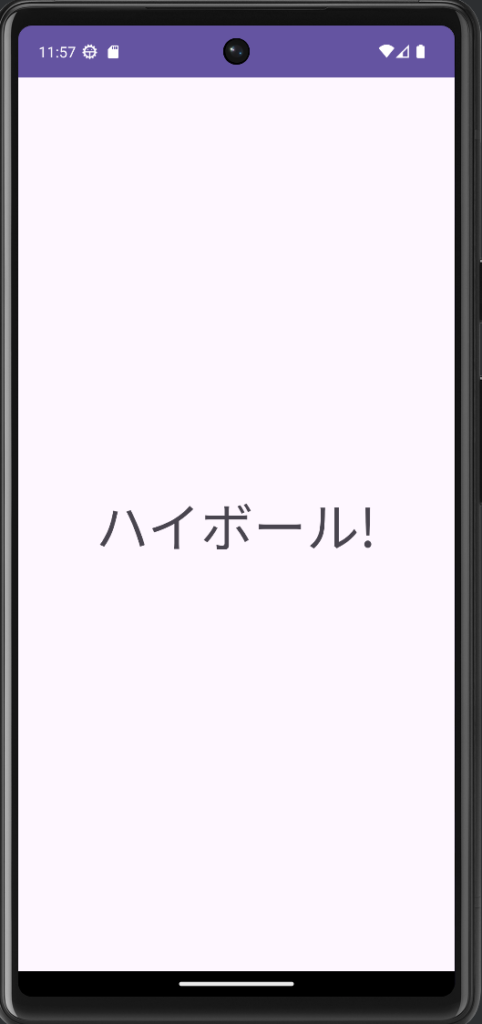
おっと またまたすみません、今夜のすだのお楽しみが画面中央にでかでかと現れてしまいました。
このように「LinearLayout」を使用して中央揃えする場合は、タグ内にandroid:gravity="center"を記述する形となります。
この場合、LinearLayoutを入れ子にして要素(テキストやボタン)を配置することで、要素は全て中央揃えとなります。
LinearLayoutを入れ子にしてネストを深くしすぎると、アプリケーションのパフォーマンスが下がってしまう場合があります。単純な配置を設定したい場合にはLinearLayoutの使用を、複雑でより自由な配置を設定したい場合にはConstraintLayoutを使用するなどして使い分けるようにしましょう。
画面全体やアプリケーション全体のことを考えると、
適切なシーンで適切な部品を使うことが大事なんですね〜!
要素を中央揃えにする方法を学べましたので、
次はもっと自由に、好きな位置に配置できるようにしていきましょう!
テキストやボタンを指定の位置に配置する方法
単純な配置ではなく、より柔軟な位置を決めたい場合は ConstraintLayoutを使用することをおすすめします。
ボタンを配置したいくつかの例を記述してみました!
<androidx.constraintlayout.widget.ConstraintLayout
    xmlns:android="http://schemas.android.com/apk/res/android"
    xmlns:app="http://schemas.android.com/apk/res-auto"
    android:layout_width="match_parent"
    android:layout_height="match_parent">

    <Button
        android:layout_width="wrap_content"
        android:layout_height="wrap_content"
        app:layout_constraintTop_toTopOf="parent"
        app:layout_constraintStart_toStartOf="parent"
        android:layout_marginTop="40dp"
        android:layout_marginStart="40dp"
        android:text="左上のボタン" />

    <Button
        android:layout_width="wrap_content"
        android:layout_height="wrap_content"
        app:layout_constraintTop_toTopOf="parent"
        app:layout_constraintEnd_toEndOf="parent"
        android:layout_marginTop="40dp"
        android:layout_marginEnd="40dp"
        android:text="右上のボタン" />

    <Button
        android:layout_width="wrap_content"
        android:layout_height="wrap_content"
        app:layout_constraintBottom_toBottomOf="parent"
        app:layout_constraintStart_toStartOf="parent"
        android:layout_marginBottom="40dp"
        android:layout_marginStart="40dp"
        android:text="左下のボタン" />

    <Button
        android:layout_width="wrap_content"
        android:layout_height="wrap_content"
        app:layout_constraintBottom_toBottomOf="parent"
        app:layout_constraintEnd_toEndOf="parent"
        android:layout_marginBottom="40dp"
        android:layout_marginEnd="40dp"
        android:text="右下のボタン" />

</androidx.constraintlayout.widget.ConstraintLayout>
画面表示してみると…!
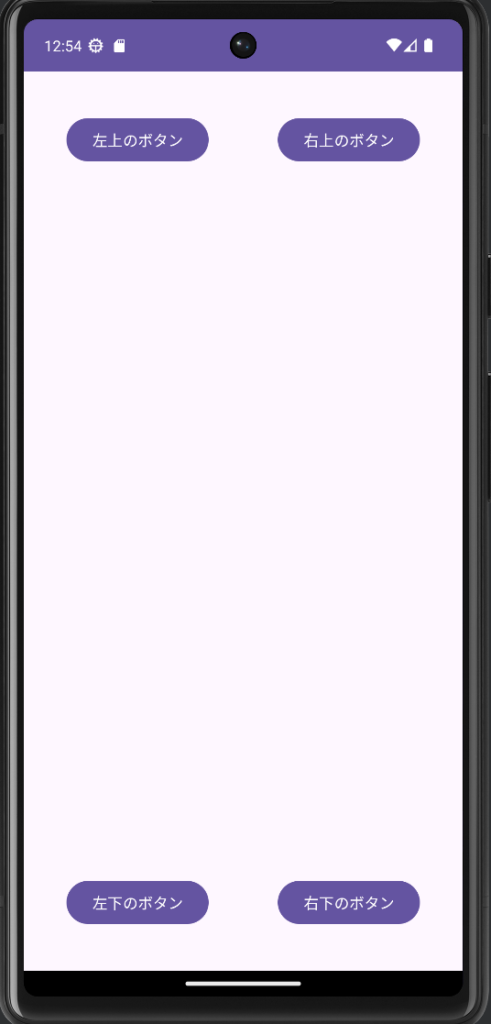
4箇所にボタンが設置されています。
基本的には、要素に「余白」を持たせることで 指定の場所に配置することができます。
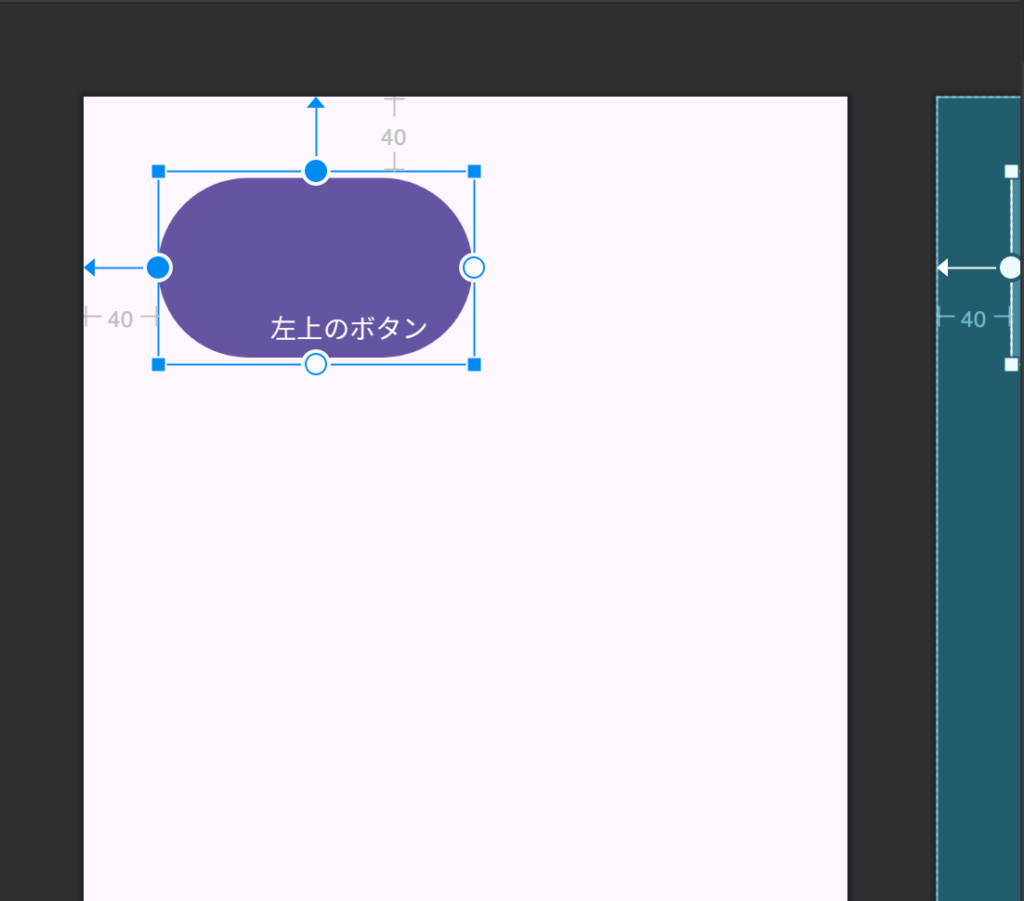
「左上のボタン」は、以下のように 、まず要素(Button)の上左2辺が親要素の各一番端になるように設定してから 各端からの余白の大きさを「layout_marginTop」「layout_marginStart」を使用して設定しています。
<Button
    android:layout_width="wrap_content"
    android:layout_height="wrap_content"

    app:layout_constraintTop_toTopOf="parent"     <!-- 要素の上端を親要素の上端に合わせる -->
    app:layout_constraintStart_toStartOf="parent" <!-- 要素の左端を親要素の左端に合わせる -->
    android:layout_marginTop="40dp"   <!-- 上端からの余白 -->
    android:layout_marginStart="40dp" <!-- 左端からの余白 -->

    android:text="左上のボタン" />
↓この画面を見るとわかりやすいです!
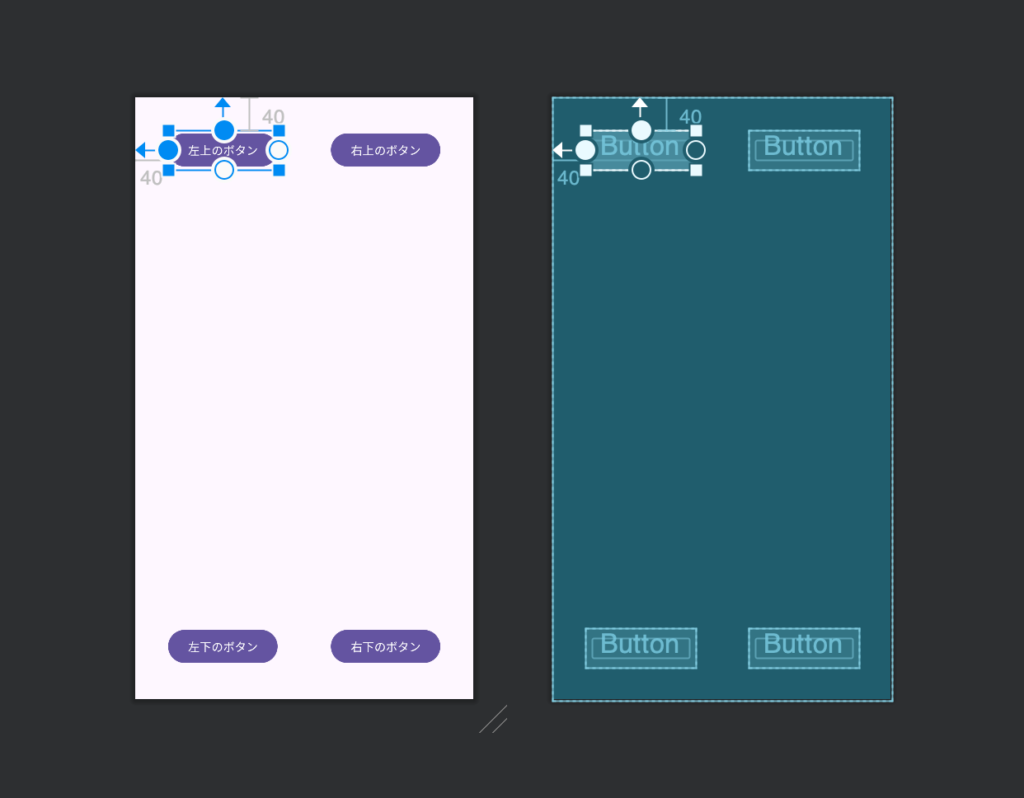
上端、左端に寄せたあと、各端からの余白を数字で指定する というイメージが湧きやすいかと思います。
その他のボタンも同じ原理で、各端からの余白を好きに設定しています。
padding を使用した例も見てみましょう。
先ほどの「左上のボタン」のタグ内に、以下のコードを追加します。
android:paddingTop="70dp"
android:paddingLeft="60dp"
画面に表示してみると ↓
このように ボタンの内側の余白が調節されていることがわかります。
上記では paddingTopで要素内側の上部に、paddingLeftで要素内側の左部に 指定した大きさで余白を持たせました。
外側と内側に余白を指定することで、要素自体の配置と要素の中身の配置を自由に決めることができるんですね〜!
どのアプリの要素も、配置を指定するシーンは必ずあると思うので、ぜひ活用してみてください!
まとめ
おつかれさまでした!いかがでしたでしょうか?
コードだけ見ると難しそうに思えますが、図を見ながらどのような原理になっているのかを理解することで 意外と簡単に配置を決めることができました!
みなさまのAndroidアプリ開発がもっと自由に楽しくなるよう、これからも色んなコンテンツで情報をお届けしていきますので またぜひ次回の記事でお会いしましょうね!


コメント