こんにちは!株式会社メモリアインクのふくしまです!
この記事ではUIViewを使用して、任意のタイミングでビューの上にオリジナルのポップアップを表示する方法を紹介します。この方法では、ブラー効果を背景に適用し、ポップアップをより一層際立たせます。
この記事を読んで分かること…
・オリジナルのポップアップを表示する方法
・ブラー(ポップアップの背景をぼやかす効果)の掛け方
環境
Xcode15
Swift5.9
オリジナルのポップアップの実装方法
概要
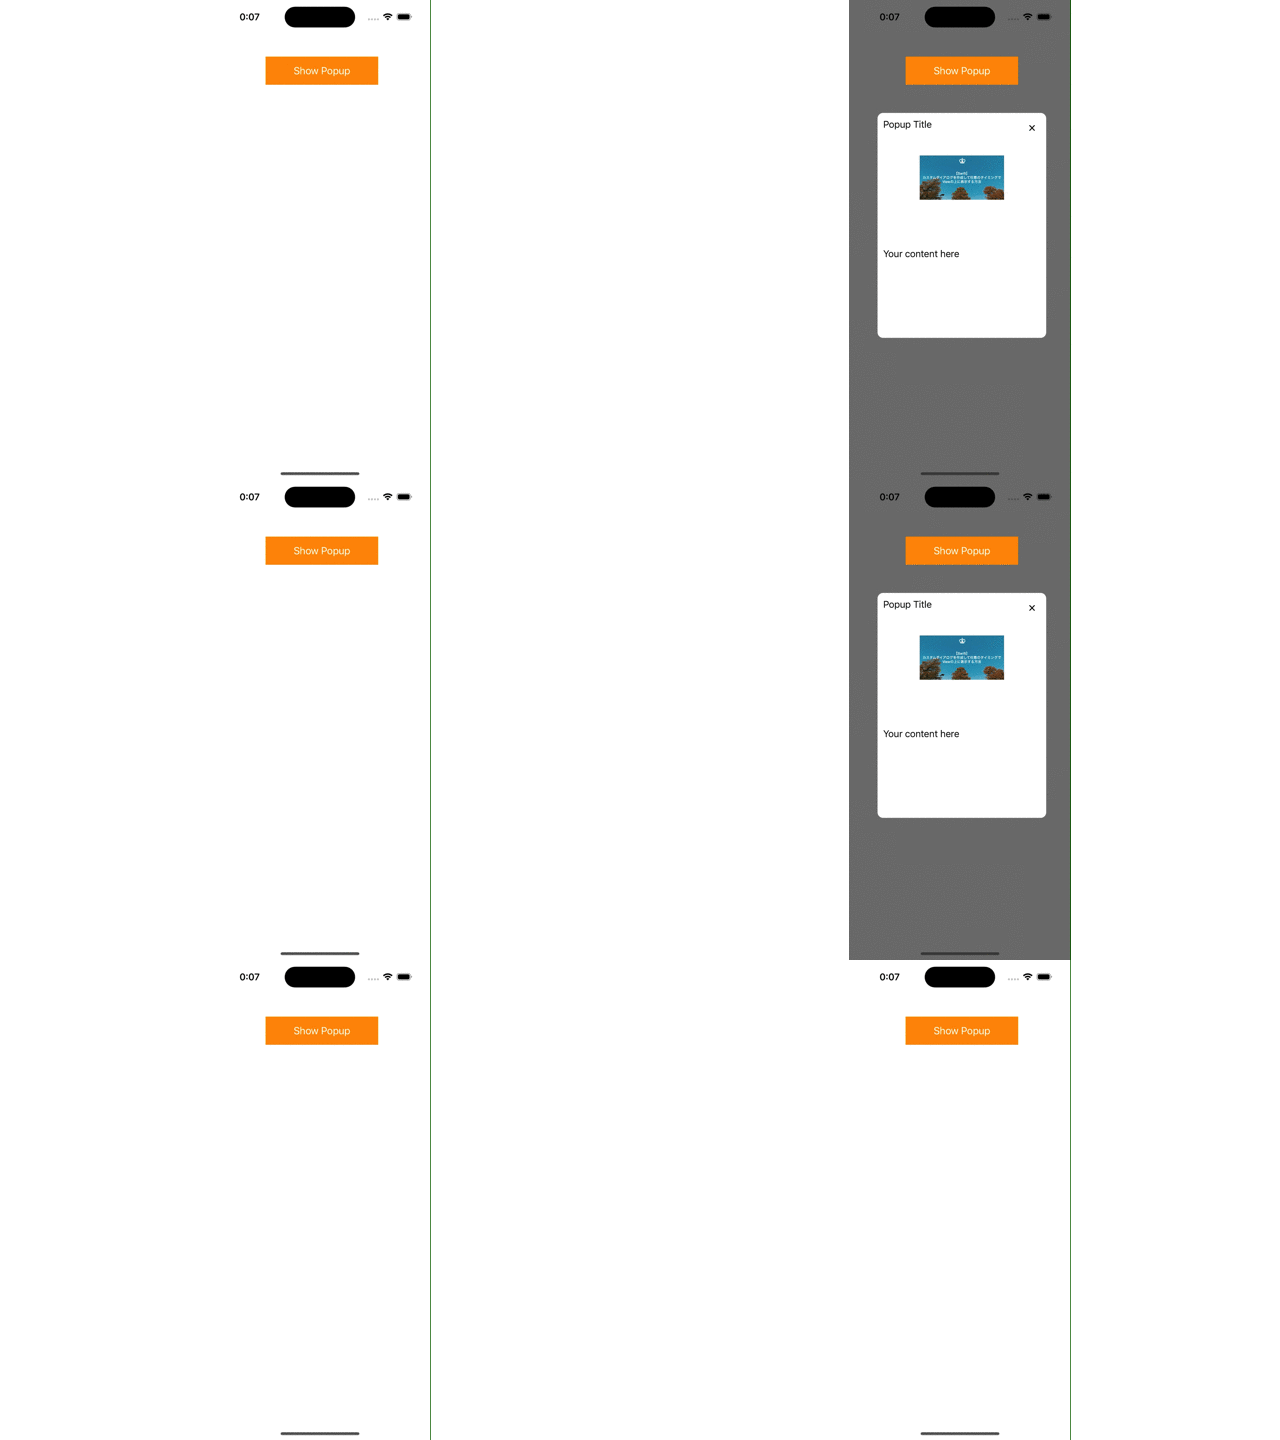
ViewControllerに配置したボタンをタップした際にブラーがかかり、その上にUIViewで作られたポップアップ(タイトル、画像、内容、閉じるボタンが含まれる)が表示される実装のコードを例に解説します。
サンプルコード
import UIKit

class ViewController: UIViewController {
    let popupView = UIView(frame: CGRect(x: 50, y: 200, width: 300, height: 400))
    let blurEffectView: UIVisualEffectView = {
        let blurEffect = UIBlurEffect(style: .dark)
        let view = UIVisualEffectView(effect: blurEffect)
        view.alpha = 0.8
        view.isHidden = true
        return view
    }()
    let showPopupButton = UIButton(frame: CGRect(x: 100, y: 100, width: 200, height: 50))

    override func viewDidLoad() {
        super.viewDidLoad()
        setupUI()
        addTapGestureToBlurEffectView()
    }

    func setupUI() {
        // ブラーの設定
        blurEffectView.frame = self.view.bounds
        blurEffectView.isHidden = true
        view.addSubview(blurEffectView)

        // ポップアップの設定
        popupView.backgroundColor = .white
        popupView.layer.cornerRadius = 10
    pView.isHidden = true
        view.addSubview(popupView)

        // ポップアップ表示ボタン
        showPopupButton.backgroundColor = .systemOrange
        showPopupButton.setTitle("Show Popup", for: .normal)
        showPopupButton.addTarget(self, action: #selector(togglePopup), for: .touchUpInside)
        view.addSubview(showPopupButton)

        // ポップアップのコンテンツの設定
        addContentToDialog()
        blurEffectView.isUserInteractionEnabled = true
    }

    // ブラー効果ビューにタップジェスチャーを追加
    func addTapGestureToBlurEffectView() {
        let tapGesture = UITapGestureRecognizer(target: self, action: #selector(togglePopup))
        blurEffectView.addGestureRecognizer(tapGesture)
    }

    func addContentToDialog() {
        let titleLabel = UILabel(frame: CGRect(x: 10, y: 10, width: 280, height: 20))
        titleLabel.text = "Popup Title"
        popupView.addSubview(titleLabel)

        let imageView = UIImageView(frame: CGRect(x: 75, y: 40, width: 150, height: 150))
        imageView.image = UIImage(named: "MyImage")
        imageView.contentMode = .scaleAspectFit
        popupView.addSubview(imageView)

        let contentLabel = UILabel(frame: CGRect(x: 10, y: 200, width: 280, height: 100))
        contentLabel.text = "Your content here"
        contentLabel.numberOfLines = 0
        popupView.addSubview(contentLabel)

     let closeButton = UIButton(frame: CGRect(x: 260, y: 10, width: 30, height: 30)) // ボタンの位置とサイズを調整
        closeButton.setTitle("×", for: .normal)
        closeButton.titleLabel?.font = UIFont.systemFont(ofSize: 22) // フォントサイズの調整
        closeButton.setTitleColor(.black, for: .normal) // ボタンのテキスト色を黒に設定
        closeButton.addTarget(self, action: #selector(togglePopup), for: .touchUpInside)
        popupView.addSubview(closeButton)
    }

    @objc func togglePopup() {
        blurEffectView.isHidden = !blurEffectView.isHidden
        popupView.isHidden = !popupView.isHidden
    }
}
サンプルコードの説明
・4-11行目:ポップアップとブラー効果のためのUIViewとUIVisualEffectViewのインスタンスを作成します。ブラー効果は初期状態で非表示に設定されます。
・20-41行目:setupUI関数では、ブラー効果のビューとポップアップビューをaddSubview でメインビューに追加しています。
・ブラーとポップアップはそれぞれのViewのisHidden プロパティをtrueにして初期状態では非表示に設定しています。
・49-70行目: addContentToDialog関数では、ポップアップビュー内にタイトル、画像、内容テキスト、閉じるボタンを配置します。画像はプロジェクトに含まれる画像ファイル名に置き換えてください。
・44-47行目: ブラーの範囲をタップした時にポップアップが閉じるよう、ブラー効果ビューにタップジェスチャーを追加
・72-75行目:ブラーとポップアップの表示・非表示を切り替えるtogglePopupメソッドを作成
ブラーをタップした時のUITapGestureRecognizerについては以下で解説していますので、併せてご確認ください!

動作確認
それではビルドして動作確認してみましょう!

まとめ
いかがでしたか?
この記事ではUIViewをカスタマイズして必要なUIコンポーネントを含むポップアップを作成し、UIVisualEffectViewを用いて背景にブラー効果を適用することで、ユーザーの注意をポップアップに集中させる方法を実装しました。
それではまた、次回の記事でお会いしましょう。この記事が皆様のiOS開発の一助になれると幸いです!
この記事があなたのスキルアップに役立ったなら、次のキャリアステップを踏み出す絶好の機会かもしれません。エンジニアとしてのさらなる成長と挑戦を求めるなら、
未経験からIT・Webエンジニアを目指すなら【ユニゾンキャリア】![]()
![]()




コメント