こんにちは!株式会社メモリアインクのふくしまです!
の記事では、具体的なサンプルコードを通じて、スワイプ操作による画面遷移の実装方法を段階的に解説していきます。
この記事を読んで分かること…
・UISwipeGestureRecognizerとは
・UISwipeGestureRecognizerを使用したスワイプ操作の基本
・スワイプ操作による画面遷移の実装方法
UISwipeGestureRecognizerとは
UISwipeGestureRecognizerはiOS開発で使用されるジェスチャー認識クラスの一つで、ユーザーが画面上で行うスワイプ動作を検出し、それに応じたアクションを実行するために用います。
スワイプで画面遷移する方法
概要
スワイプジェスチャーによる画面遷移の実装例を示します。UISwipeGestureRecognizerをViewControllerに追加し、遷移先のViewControllerをStoryboardに追加し、スワイプでその画面に遷移するようにします。
開発シーンではニュースアプリやショッピングアプリで、ユーザーがアイテムのリストを閲覧している画面があり、アイテムをスワイプすることでその詳細画面に遷移するというシナリオで使われたりします。
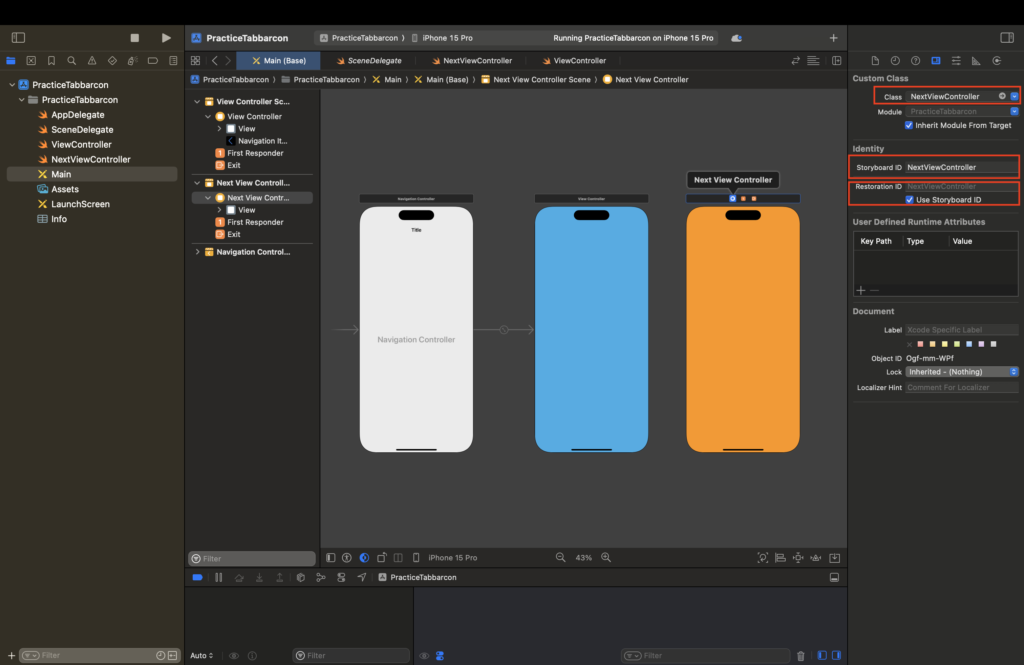
UI設計
①ViewControllerを選択して、NavigationControllerを追加
Editor→Embed In→Navigation Controller
②遷移先のNextViewControllerを追加して、対応するSwiftファイルとStoryBoard IDを設定
③画面の色は自由に変更してくださ(遷移したことが分かるように)
サンプルコード
import UIKit

class ViewController: UIViewController {

    override func viewDidLoad() {
        super.viewDidLoad()
        let swipeLeft = UISwipeGestureRecognizer(target: self, action: #selector(swiped))
        swipeLeft.direction = .left
        self.view.addGestureRecognizer(swipeLeft)
    }

    @objc func swiped(gesture: UIGestureRecognizer) {
        if let swipeGesture = gesture as? UISwipeGestureRecognizer {
            switch swipeGesture.direction {
            case .left:
                // 左スワイプ時の処理
                let storyboard = UIStoryboard(name: "Main", bundle: nil)
                let nextVC = storyboard.instantiateViewController(withIdentifier: "NextViewController") as! NextViewController
                self.navigationController?.pushViewController(nextVC, animated: true)
            default:
                break
            }
        }
    }
}
サンプルコードの説明
◾️5−10行目:viewDidLoadメソッド内でスワイプジェスチャーを設定
・7行目:左スワイプを認識するUISwipeGestureRecognizerを作成
・8行目:スワイプの方向を左(.left)に設定
・9行目:作成したジェスチャーをビューに追加directionプロパティを変更することで、上下左右任意の方向のスワイプを検出することができます。
◾️12−24行目:swipeActionメソッド内で、スワイプ操作に応じて画面遷移するロジックを実装します。
・13−21行目:swipeActionメソッドで、スワイプの方向に応じて条件分岐
・15−19行目:左スワイプの場合、SecondViewControllerへの遷移を実行。
以下で画面遷移の方法について解説しているので、まだあまり理解できていないよーという方は併せてご覧ください!
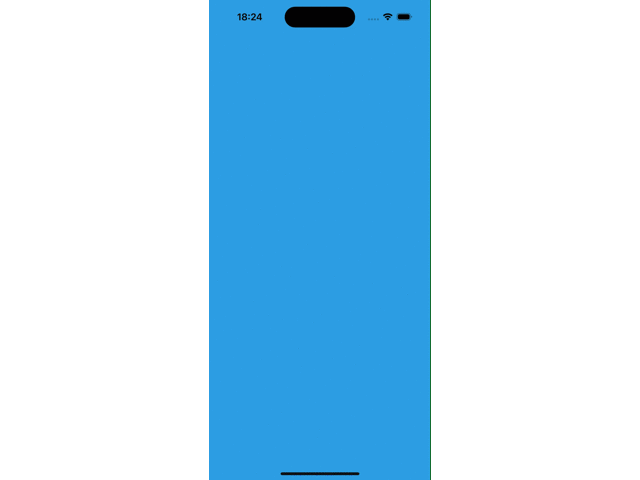
動作確認
それではビルドして、動作確認をしてみましょう!
まとめ
いかがでしたか?
本記事では、SwiftとXcodeを使ったUISwipeGestureRecognizerの基本から、具体的なスワイプ操作による画面遷移の実装方法までを詳細に解説しました。
この記事が、皆様の開発ライフの一助になれれば幸いです!
この記事があなたのスキルアップに役立ったなら、次のキャリアステップを踏み出す絶好の機会かもしれません。エンジニアとしてのさらなる成長と挑戦を求めるなら、
未経験からIT・Webエンジニアを目指すなら【ユニゾンキャリア】![]() をオススメします!
をオススメします!


コメント