こんばんは〜
弊社ブログに辿り着いていただきありがとうございます!
株式会社メモリアインクのいちのです
この記事を読むことでわかること
- ElevatedButtonを使ったボタンの基本的な作成方法
- ボタンを画面の中央、上下左右に配置する方法
- Flutterでのレイアウト管理の基本
開発環境
- Dart 3.0.0
- Flutter 3.10.0
ElevatedButtonの基本
ElevatedButtonは、マテリアルデザインのガイドラインに基づいた、影付きのボタンウィジェットです。以下は、最も基本的なElevatedButtonを作成するサンプルコードです。
ElevatedButton(
  onPressed: () {
    // ボタンが押された時の動作
  },
  child: Text('ボタン'),
)
解説
- このコードは、テキストが「ボタン」と表示されるボタンを作成します。
onPressedプロパティには、ボタンが押されたときに実行したい処理を記述します。
画像ボタンにご興味のある読者様。以下の記事で分かりやすく丁寧に解説しておりますので、ぜひご一読いただけますと幸いです。

ボタンの配置方法
中央(Center)に配置
Center(
  child: ElevatedButton(
    onPressed: () {},
    child: Text('中央に配置'),
  ),
)
解説
Centerウィジェットを使用して、ボタンを画面の中央に配置します。
動作確認
それでは実際の動作を見てみましょ〜

上(Center)に配置
Align(
  alignment: Alignment.topCenter,
  child: ElevatedButton(
    onPressed: () {},
    child: Text('中央上に配置'),
  ),
)
解説
AlignウィジェットのalignmentプロパティをAlignment.topCenterに設定して、ボタンを画面の上中央に配置します。
動作確認
それでは実際の動作を見てみましょ〜

下(Center)に配置
Align(
  alignment: Alignment.bottomCenter,
  child: ElevatedButton(
    onPressed: () {},
    child: Text('中央下に配置'),
  ),
)
解説
AlignウィジェットのalignmentプロパティをAlignment.bottomCenterに設定して、ボタンを画面の下中央に配置します。
動作確認
それでは実際の動作を見てみましょ〜

左(Center)に配置
Align(
  alignment: Alignment.centerLeft,
  child: ElevatedButton(
    onPressed: () {},
    child: Text('中央左に配置'),
  ),
)
解説
AlignウィジェットのalignmentプロパティをAlignment.centerLeftに設定して、ボタンを画面の中央左に配置します。
動作確認
それでは実際の動作を見てみましょ〜

右(Center)に配置
Align(
  alignment: Alignment.centerRight,
  child: ElevatedButton(
    onPressed: () {},
    child: Text('中央右に配置'),
  ),
)
解説
AlignウィジェットのalignmentプロパティをAlignment.centerRightに設定して、ボタンを画面の中央右に配置します。
動作確認
それでは実際の動作を見てみましょ〜

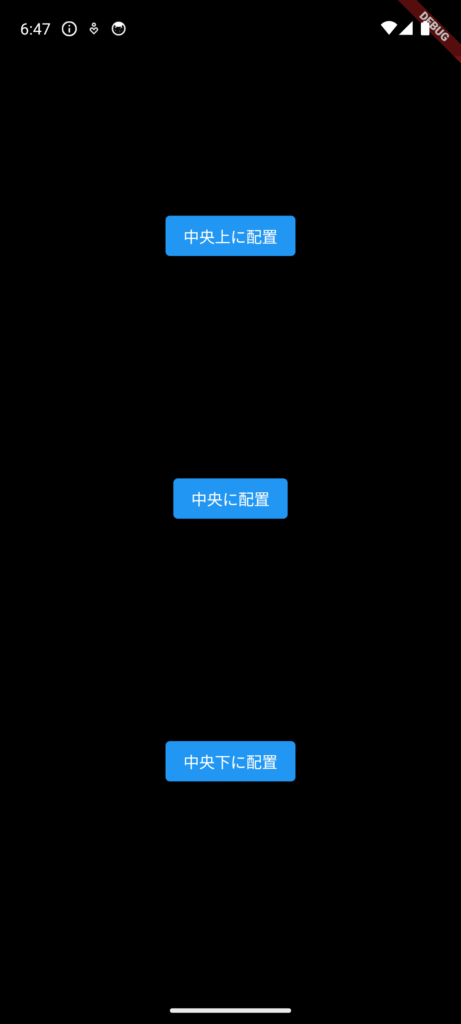
ボタン(ElevatedButton)を中央、中央上、中央下に均等配置する
Columnウィジェットを使って、各配置のボタンを縦に並べています。
ウィジェットについて詳しく知りたいという方は以下記事で解説しておりますのでぜひ!
以下は、ボタン(ElevatedButton)を中央、中央上、中央下に均等配置するファイル全体のサンプルコードです。
import 'package:flutter/material.dart';

void main() => runApp(MyApp());

class MyApp extends StatelessWidget {
  @override
  Widget build(BuildContext context) {
    return MaterialApp(
      home: Sample(),
    );
  }
}

class Sample extends StatelessWidget {
  @override
  Widget build(BuildContext context) {
    return Column(
      mainAxisAlignment: MainAxisAlignment.spaceEvenly,
      children: <Widget>[
        Align(
          alignment: Alignment.topCenter,
          child: ElevatedButton(
            onPressed: () {},
            child: Text('中央上に配置'),
          ),
        ),
        Center(
          child: ElevatedButton(
            onPressed: () {},
            child: Text('中央に配置'),
          ),
        ),
        Align(
          alignment: Alignment.bottomCenter,
          child: ElevatedButton(
            onPressed: () {},
            child: Text('中央下に配置'),
          ),
        ),
      ],
    );
  }
}
詳しい解説
Columnウィジェットを使ってボタンを縦に並べます。mainAxisAlignmentプロパティをMainAxisAlignment.spaceEvenlyに設定して、各ボタン間の空間を均等に分布させます。AlignとCenterウィジェットを使用して、ボタンの配置を制御します。
動作確認
画面の表示を確認してみましょ〜
余白の設定についてもご興味のある読者様。以下の記事がオススメですので、ご一読いただけますと幸いです。
まとめ
この記事では、FlutterでのElevatedButtonの基本的な使い方と、それを画面の中央や上下左右に配置する方法を解説しました。Flutterでは、Align, Center, Columnなどのウィジェットを組み合わせることで、柔軟にUIを構築することが可能です。この知識を活用して、より魅力的なアプリケーションの開発に挑戦してみてください。
自分の成長を加速させるチャンスがどこかにあるかもしれません。
変化を恐れずに新たな環境に飛び込む勇気のある方は、
未経験からIT・Webエンジニアを目指すなら【ユニゾンキャリア】![]() をオススメします。
をオススメします。
アイコンボタンやテキストボタンにご興味のある読者様。以下個人的に自信作の記事をぜひ!


コメント
コメント一覧 (4件)
[…] 【Flutter】簡単にボタン(ElevatedButton)を作成し、中央(Center)、上下左右に配置… […]
[…] 【Flutter】簡単にボタン(ElevatedButton)を作成し、中央(Center)、上下左右に配置… […]
[…] 【Flutter】簡単にボタン(ElevatedButton)を作成し、中央(Center)、上下左右に配置… […]
[…] 【Flutter】簡単にボタン(ElevatedButton)を作成し、中央(Center)、上下左右に配置… […]